

Farmer's Market Season!


It’s that time of year.
Farmer’s markets are popping and for the next few months I’ll be able to find at least one within an hour or so of home every day of the week. Yes, I’m lucky to live somewhere that gives me that opportunity. Yes, I’m beyond grateful to be able to make it a part of my everyday for the coming months. I’ll be the one, coffee in hand, slowly making my way around the stalls, petting dogs, and hugging a farmer or two.
This is where I fell in love with tomatoes.
It’s where my mind was completely changed about cantaloupe.
Delicious food. Inspiration everywhere. Community. I wouldn’t have it any other way.
Whenever I travel, I make it a point to visit the local market. It’s where you really get the vibe of a place. And for so many countries outside of North America, it’s a part of everyday life. I love it for that because you get to dive in and feel the community wherever you are. There’s something magical about everyone mingling together. Locals grabbing their supplies for the day. Tourists browsing with wonder seeing new things at every turn. Is there anything more special than having that experience with a vendor that gives you something new to try? That feeling of tasting something new and the look of pride on the face of the person that gave it to you? The one who took the time to make or grow it for you? You don’t have to speak the same language to connect over that am I right?
Back to home. I love seeing more and more markets around and the fact that more and more people are understanding the importance of choosing to invest in our local farmers. I also get it that not everyone is able to do so for so many reasons we can save for another day. All I know is that the way things change is one person (or fork) at a time so if you can, do it! Where you choose to spend your money matters.
If you feel a little overwhelmed when it comes to navigating the market or just want some ideas on how to make the experience even more enjoyable, here’s some thoughts:
Don’t rush. Like I said up top, I like to make my trip an experience and choose to go slow. I usually do a lap around to see what catches my eye. I will go with an idea of what I need, and especially now you’ll find lots of options for the same ingredient so take your time to find what looks the best to you.
If you are on a time crunch, get in touch with your favourite vendors and ask if they can have certain things ready for you. Also, if you know certain spots that run out of things quickly there’s nothing wrong with asking to put something aside for you so you don't miss out. Every vendor is different when it comes to this and some won’t to be fair but it never hurts to ask.
Speaking of asking, if you’re looking for something in particular, ask! My experience is that everyone is super helpful and if one doesn’t have what you’re looking for they’ll likely know of another who does and are happy to recommend their fellow vendor.
Try new things. If there was ever a place for inspiration and creativity to hit, it’s at the market. And while I usually go with a list of the usual suspects, I’ll always come home with something different too. Never cooked artichokes? Here’s your chance. Maybe there’s a salad green you’ve never heard of before? You never know if you’ll like it until you try. If you’re unsure about something - again, ask. Most will even let you have a little taste test before you buy too.
If you’re making sauces or jams you can usually find vendors that have discounted imperfect produce. You get a deal, things don’t go to waste and you still get delicious results.
Can’t make it to the market? Try a CSA box from one of your local farmers. Again, this is something I’m seeing more and more of and it’s great! When you sing up for CSA (Community Supported Agriculture) box you’re directly supporting the farmers and it’s a fun option because you never know exactly what you’re going to get so it’s a chance to get creative with ingredients maybe you’ve never tried before.
Tell me your favourite things about the Farmer’s Market in the comments below!
What’s Cooking This Week: Radishes 3 Ways
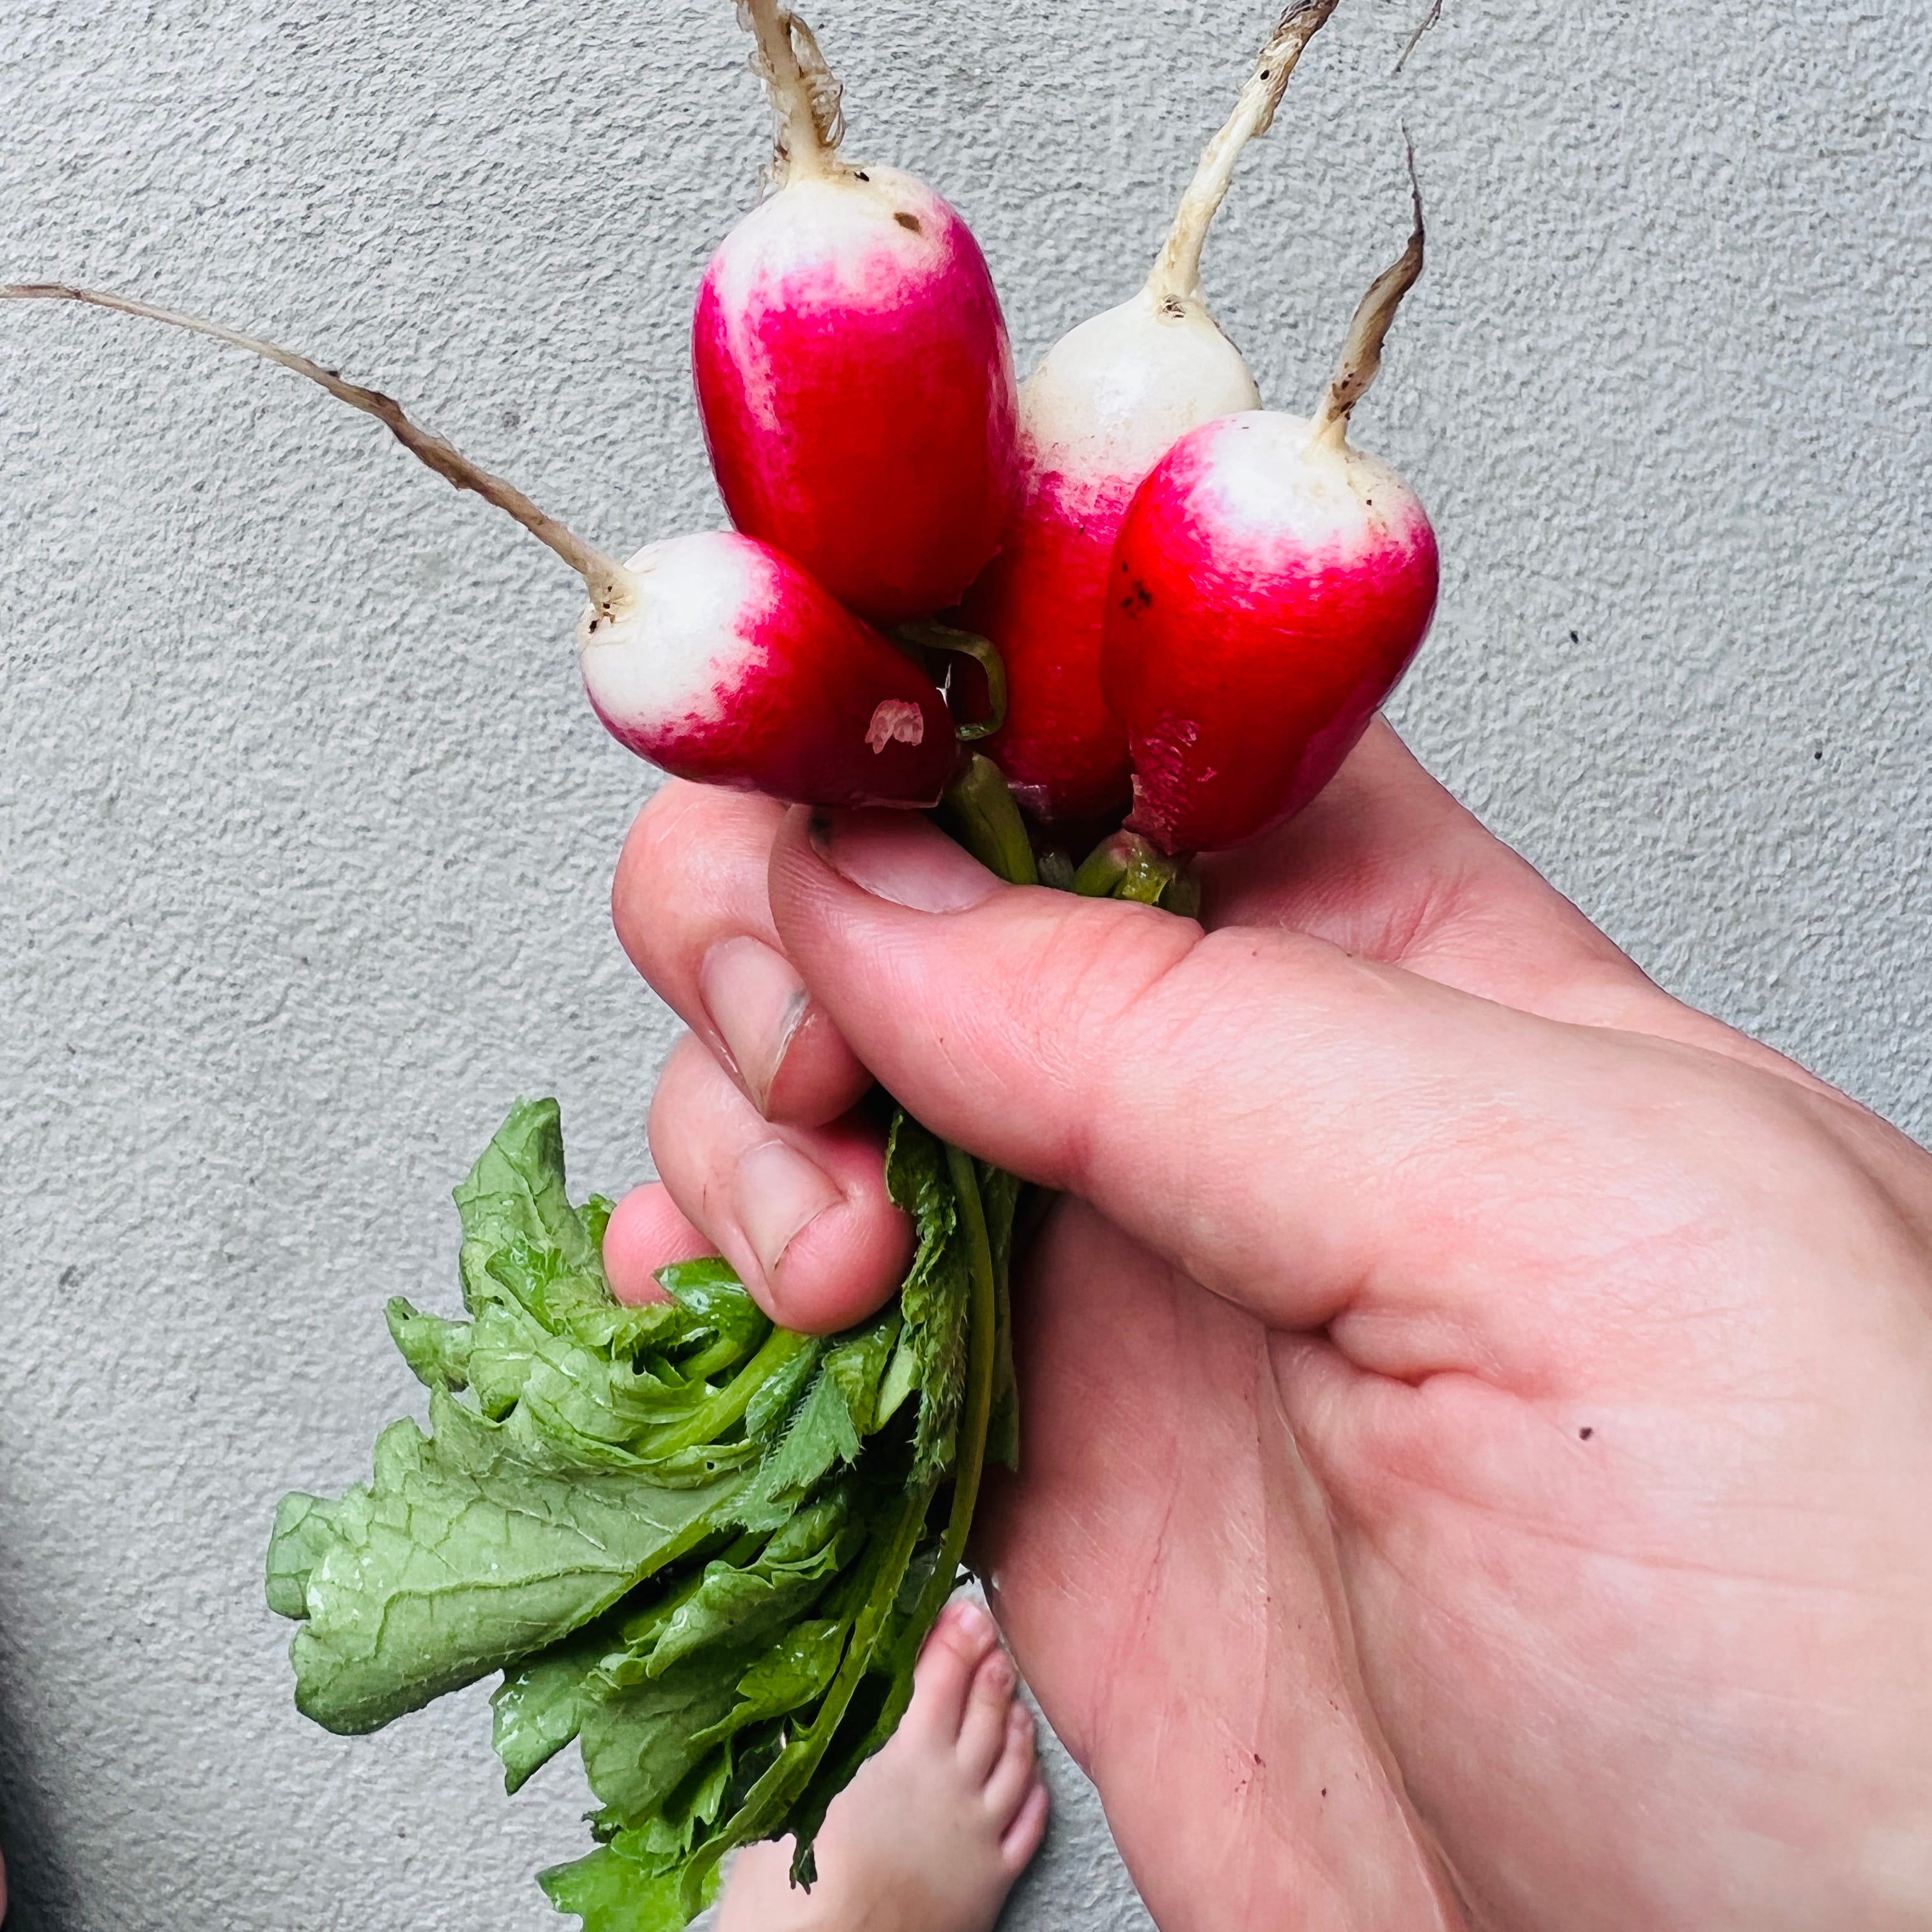
The first harvest from my garden. :) I don’t know about you but you just can’t beat these easy to grow little gems. So I’m giving them some love this week with 3 ‘recipes’ for you. One other thing I’ll say is, don’t toss the greens! If you’ve grown them or picked them up at the market you’ll want to eat these! Toss them in with salad greens, add them to soup, stir fry, or any way you’d normally cook other greens.

Tempura Radishes
I've finally got the tempura batter dialed in. You can use this master recipe for any vegetable but it’s extra special with fresh radishes. The way the greens puff up, the peek of pink or red of the radishes through the batter. Magical.
If you've never played with tempura batter it's easy to make at home, there's just a few little things to do so that you get the lightest, crispiest result at home. Check out the notes at the bottom and give it a go! Easy things to serve with this that can be made ahead; pickled cucumber salad or cold soba noodle salad.
Tempura Radishes
85 g pastry flour or all purpose flour
15 g cornstarch
145 ml ice cold water
2 tablespoons kewpie mayonnaise
8-10 radishes, washed with greens still attached - if the radishes are large, cut them in half
vegetable oil for frying
Furikake for serving
Mix the flour and the cornstarch in a small bowl. Refrigerate for 30 minutes or if you're in a hurry, pop it in the freezer for 15 minutes.
While the flour is chilling, heat your oil to 350* in a large dutch oven or deep fryer if you have it.
Prepare the radishes by washing, cutting in half (if needed) then dried really well. To help the batter to stick I like to toss the radishes in flour at this point, shaking off any excess then set aside while you make the batter.
To make the batter, combine the water and mayo in a medium bowl.
Remove the flour from the fridge and add the flour in 3 parts, using a chopstick or fork draw crosses through the batter to combine. When all the flour is added, mix until juts combined. It's okay if there's lumps, there’s supposed to be - you don't want to over mix!
Test the oil by dropping a little bit of the batter in. If it sizzles right away it's ready.
Dip the radishes in the batter and carefully add to the oil. The radish greens will expand so you'll likely have to do these in batches as not to overcrowd them. Cook until the radishes are crisp and just before they're golden brown, about 3-4 minutes.
Transfer the radishes to a cooling rack and season right away with salt. Continue until all the radishes are cooked.
Arrange the radishes on a platter and sprinkle with furikake to serve.
Tempura tips:
Exact measurements are important so use a scale.
Use ‘weak’ flour - one that’s lower in gluten, I like pastry best but all purpose will work, just not bread flour!
Get everything really cold - I put ice cubes in a measuring cup with water and put that in the fridge for 10 minutes then when I’m ready, measure out the water.
Don't over mix! A whisk is not your friend here.
Work quickly. Have everything prepped before you mix the batter. The less time it sits the better result you get so make sure to have the oil ready, your ingredients set to go so you can mix and fry.
Don't overcrowd your veggies - better to go with less and do more batches otherwise they'll steam and turn out greasy or not super crisp.

Radishes with Butter & Salt
This is a very French thing to do. And I always thought it was weird - until I tried it! The crunchy, sometimes spicy radishes combined with the smooth, creamy butter and a hit of Maldon salt is magical. It's no brainer appetizer for sunny afternoons on the patio with a glass of cold rose. You could also make this into a crostini with some good bread - slather the butter, sprinkle the salt and arrange sliced or halved radishes on top. You don’t need a recipe for this so instead there’s some suggestions below.
Making them the best:
Invest in the best butter you can find. If you can find a French brand, it's worth it.
Make sure the butter is room temperature so it's nice and spreadable.
I like to cut the radishes in half to have the most surface area for spreading.
Maldon salt is the only salt to use here. Big flakes for maximum flavour.
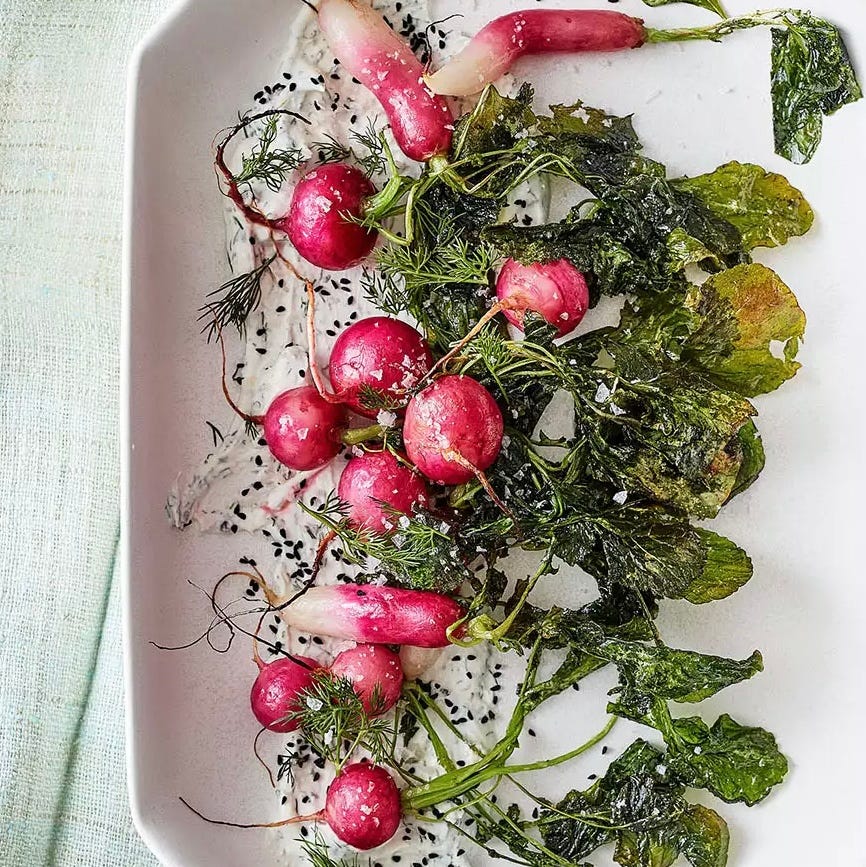
Roasted Radishes
If you've never cooked radishes before, time to change that! The radishes lose their heat and turn into juicy, sweet goodness. Cut them in half and cook them cut side down to get some beautiful caramelized goodness or keep them whole to get more of the natural radish flavour. Either way I like to keep the greens on for some delicious contrast. And they just look pretty on the plate, right?
Preheat the oven to 375*
Toss the radishes in a bowl with a good drizzle of olive oil and season liberally with salt and pepper.
Arrange the radishes on a baking sheet, making sure not to overcrowd as they will steam instead of brown if you do.
Bake the radishes for 15-20 minutes or until slightly browned and soft when pierced with a knife.
They're great served on their own however if you want a sauce, I like to mix creme fraiche or yogurt with a big handful of fresh herbs (basil, parsley, dill, oregano, etc) and a squeeze of lemon. Spread it on a platter and top with the radishes to serve.

Want more with me?
Ready to learn the pleasure and the principles of cooking well? Let’s Cook with Intention
Sourdough 101 - master the magic of sourdough bread - this is the place if you want to learn all things sourdough AND you can even learn to make your own baguettes :)
Happy Market Season :)
love,
Krista